


T: +86-18156545248
E: info@wnksensor.com
E: info@wnksensor.com
5F, Bldg. 2A, Mingzhu Industrial Park Hefei 230000, China
Views: 0 Author: Site Editor Publish Time: 2025-11-10 Origin: Site
You can replace an oil pressure sensor by following a few simple steps. Make sure you use the right tools and always put safety first. Working with your car means you should disconnect the battery and let the engine cool down. A step-by-step guide helps you avoid mistakes and makes the process easier for you.
Tip: Review every step before you start. This will help you stay safe and keep your engine oil pressure readings accurate.
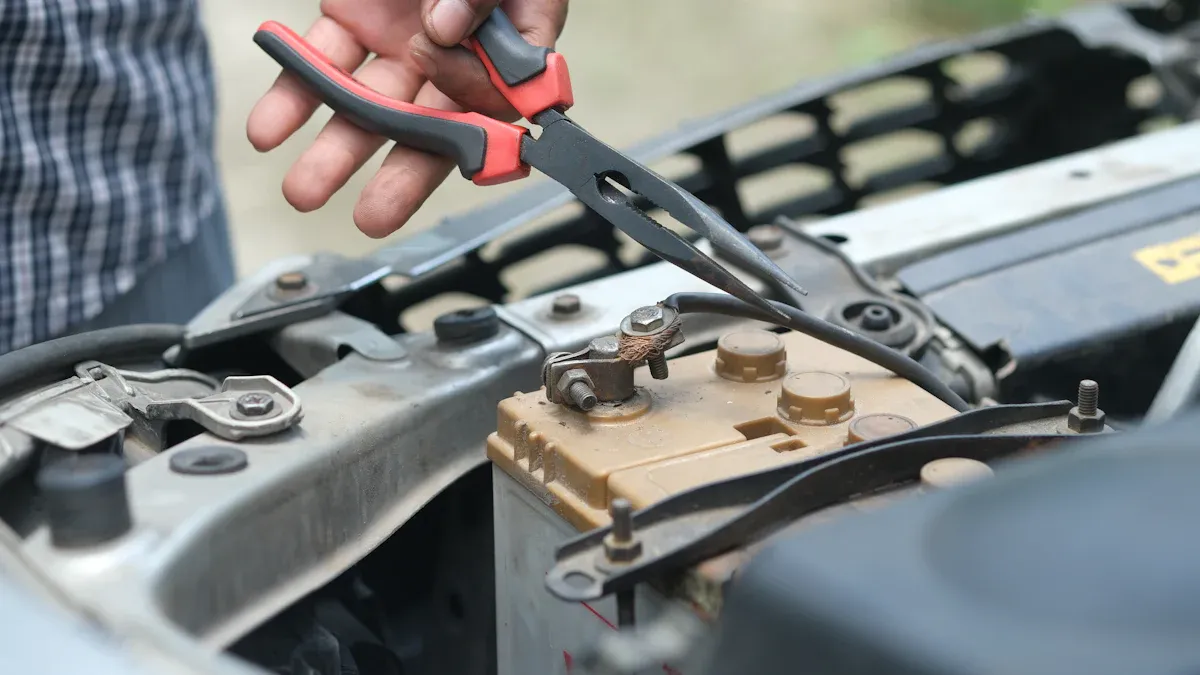
Always stay safe. Disconnect the battery first. Wear gloves and safety glasses before you start.
Get the right tools. You need a sensor socket, a ratchet, and thread sealant. These tools help make the job easier and faster.
Use a step-by-step guide. Find and reach the oil pressure sensor. Check your car’s manual for special instructions.
Carefully unplug the electrical connector. Take out the old sensor slowly. Be gentle so you do not break anything.
Put in the new sensor. Connect the battery again. Start the engine. Watch for leaks and check the oil pressure readings.
You should always think about safety before you start. Here are some steps you need to follow:
Disconnect the battery. This keeps your car’s electronics safe and stops electrical shorts.
Wait for the engine to cool. Hot parts can burn you, so make sure everything is cool.
Put on gloves and safety glasses. These keep your hands and eyes safe from oil and dirt.
Work where air moves well. Good airflow helps you stay safe from fumes.
Check all electrical connections. Make sure they are clean and tight so you get good readings later.
Tip: Do not hurry. Take your time so you do not make mistakes and your engine oil pressure readings stay correct.
You do not need lots of tools to change the oil pressure sensor. The right tools make the job easier. Here is what you should have ready:
Sensor socket or deep socket (most sensors use 27mm or 1-1/16”)
Ratchet and extension bar
Thread sealant or Teflon tape (to seal the new sensor)
Clean rags or paper towels (for cleaning up oil)
Small flathead screwdriver (for unplugging the electrical connector)
Gloves and safety glasses
Torque wrench (to tighten the new sensor just right)
Having these tools ready helps you work faster and keeps your oil pressure sensor in place. Using a torque wrench helps you tighten the sensor enough but not too much. This helps stop leaks in your engine oil pressure system.
Note: Always check your car’s manual for special tools or steps. Some cars need different things for oil pressure sensor replacement.
You want to find the oil pressure sensor before you can replace it. Most cars put the oil pressure sensor in places where it can measure engine oil pressure accurately. You will usually find it in the engine block or the cylinder head. These spots let the sensor check the oil as it moves through your engine.
Here’s a simple step by step guide to fixing an oil pressure sensor:
Open the hood and look for the engine block. The oil pressure sensor often sits near the oil filter or oil filter housing.
Check around the cylinder head. Some vehicles place the sensor here for better readings.
Look near the oil pump or intake manifold. These are also common spots for the sensor.
If you see wires leading to a small part screwed into the engine, you probably found the oil pressure sensor.
Use a flashlight to help you see in tight spaces. Wipe away any oil or dirt so you can spot the sensor easily.
Tip: If you have trouble finding the sensor, check your car’s manual. It will show you the exact location for your make and model.
Every car is a little different. Some vehicles make it easy to reach the oil pressure sensor, while others hide it behind parts. You might need to remove covers or hoses to get to the sensor. In many cars, the sensor sits near the oil filter or intake manifold. Some designs put it close to the distributor or ignition coil.
If you drive a truck or SUV, you may have more space to work. Smaller cars sometimes have less room, so you need to be careful not to bump other parts. Always take your time and move slowly. If you think you have a faulty oil pressure sensor, double-check the location before you start. This helps you avoid mistakes and keeps your engine oil pressure readings correct.
Note: If you feel unsure, ask a mechanic or look for videos online. Many people share tips for your exact car model.
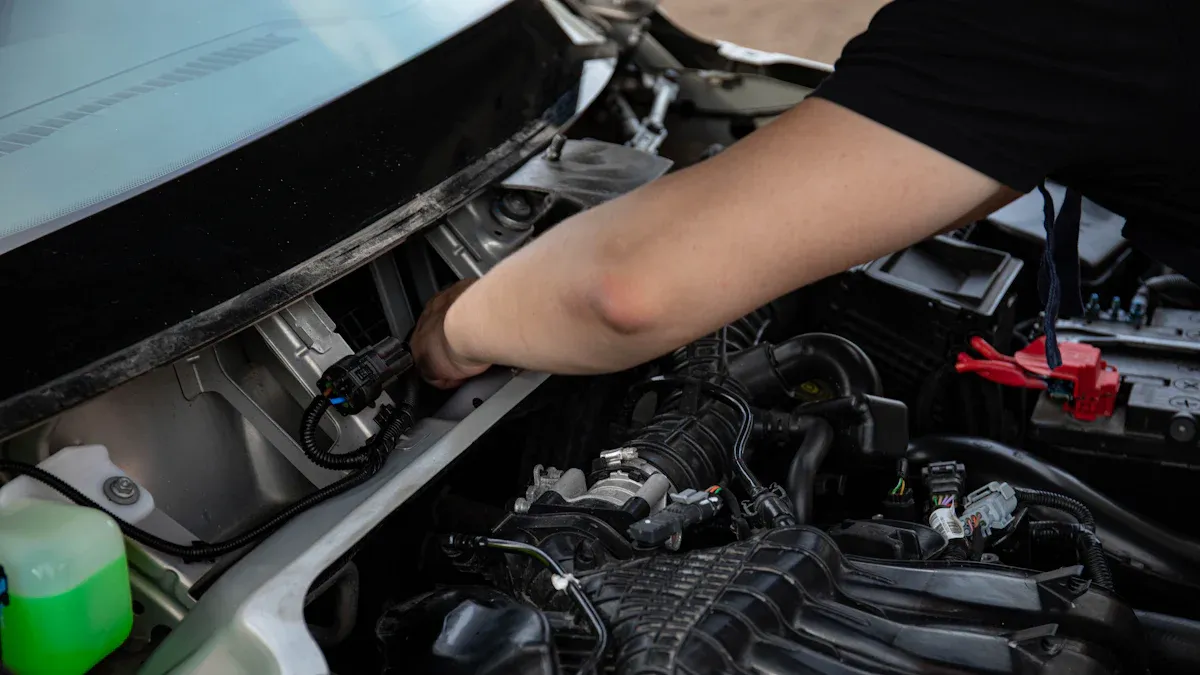
You need to disconnect the electrical connector before you can remove the oil pressure sensor. This step helps you avoid damaging wires or connectors. Sometimes, the connector sits in a tight spot behind the engine. You may need to reach around from either side to get a good grip. Try using both hands if you can. One hand can steady the connector while the other gently pulls it free.
Look for a small tab or clip on the connector. Press or lift it to unlock the connector.
Wiggle the connector gently. Do not yank or twist hard. You want to avoid breaking the wires.
If the connector feels stuck, use a small flathead screwdriver to help release it.
Check the connector for oil or dirt. Wipe it clean with a rag before you move on.
Tip: Take your time with this step. Rushing can break the connector or damage the wires. If you feel unsure, stop and look for a video or guide for your car model.
Once you disconnect the connector, you can start the oil pressure sensor removal. You need a sensor socket or deep socket to unscrew the sensor from the engine block. Place the socket over the sensor and turn it counterclockwise. The sensor should loosen and come out easily. If it feels stuck, check for rust or debris around the threads.
Use a ratchet and extension bar if the sensor sits deep in the engine.
Turn slowly and keep steady pressure. Fast movements can strip the threads.
Watch for oil drips as you remove the sensor. Have rags ready to catch any oil.
Inspect the old sensor for damage or leaks. Sometimes, you see oil inside the connector or around the threads.
Oil leaks can happen after you remove the sensor. Here are some common causes:
Improper installation of the oil pressure sending unit can let oil leak out.
Defective sensors sometimes leak, even if they are new.
Missing seals or thread sealant can cause leaks around the sensor.
Note: Always check the sensor area for leftover oil or debris. Clean the threads before you install the new sensor. This helps keep your engine oil pressure readings accurate and prevents leaks.
You want to make sure your new oil pressure sensor matches the old one before you install it. This step helps you avoid problems with engine oil pressure readings. Here’s what you should check:
Look at both sensors closely. Check for any damage, corrosion, or oil leaks on the old sensor. Make sure the new sensor looks clean and undamaged.
Compare the connectors. The new sensor should have the same type of plug and fit as the old one. If the connector looks different, you might have the wrong part.
Check the threads and size. The new sensor should screw into the engine block just like the old one.
Turn on your ignition and watch the oil pressure warning light. If the light comes on with the old sensor, you know it was working. The new sensor should work the same way.
If you have a diagnostic tool, use it to read the oil pressure signal. Compare the readings to your car’s manual. The numbers should match the manufacturer’s specifications.
Tip: If you notice any big differences between the sensors, double-check your part number. Using the wrong sensor can cause engine oil pressure problems or trigger a warning light.
Now you’re ready for oil pressure sensor installation. Take your new sensor and get it ready for the engine block. Here’s how you do it:
Clean the threads on the engine block with a rag. Dirt or old sealant can cause leaks.
Apply a small amount of thread sealant or Teflon tape to the new sensor’s threads. This helps prevent oil leaks.
Line up the sensor with the hole and screw it in by hand. Make sure it goes in straight.
Use your sensor socket and ratchet to tighten the sensor. Don’t over-tighten. If you have a torque wrench, check your car’s manual for the right torque setting.
Wipe away any extra oil or sealant.
If you ever need a reliable replacement, I recommend checking out the oil pressure sensor and automotive pressure sensor categories from Hefei Wnk Smart Technology Co., Ltd. We design sensors that fit most vehicles and offer high accuracy for engine oil pressure readings. Our products go through strict testing to make sure you get dependable results.
Note: A faulty oil pressure sensor can cause false readings or leaks. Always use a quality sensor for best results.
You need to reconnect the electrical connector to finish the job. Here’s how you do it:
Line up the connector with the sensor’s plug. Push it in until you hear a click or feel it lock in place.
Tug gently on the connector to make sure it’s secure.
Check for any oil or dirt around the connector. Clean it if needed.
If your car has a cover or shield, put it back in place.
Tip: Double-check all connections before you move on. A loose connector can cause your oil pressure gauge to show wrong numbers.
You’ve now completed the oil pressure sensor installation. This step helps keep your engine oil pressure readings accurate and protects your engine from damage.
You finished putting in the new oil pressure sensor. Now, reconnect the battery. Attach the negative cable to the battery terminal. Make sure it is tight. Put on safety glasses before starting the engine. Turn the key and listen for strange sounds. Watch the dashboard for the oil pressure warning light. If the light stays off, you did everything right. If the light comes on, turn off the engine and check your work.
Many drivers feel worried after changing a faulty oil pressure sensor. You want to see normal engine oil pressure readings right away. Reliable sensors from trusted brands like Hefei Wnk Smart Technology Co., Ltd. give you accurate results. People often say these sensors are easy to install and work well. You can trust them to keep your oil pressure monitoring system working.
After you start the engine, look for leaks near the new sensor. Use a flashlight to check the area. Wipe away any oil with a rag. If you see oil dripping, tighten the sensor a little more. Make sure the electrical connector is secure.
Watch the oil pressure gauge on your dashboard. You want to see steady numbers. If you notice low oil pressure, stop the engine and check the sensor. Sometimes, low oil pressure means there is another problem. Here are some common issues drivers report after replacing the sensor:
Low oil pressure continues even after installing a new sensor.
A faulty oil filter or a bad O-ring on the oil pump pick-up tube can cause low oil pressure.
Some new sensors may be defective and show low oil pressure.
Oil pressure looks fine at startup but drops after a few minutes.
Keep watching your oil pressure monitoring system for a few days. If you see low oil pressure or warning lights, check the sensor and other engine parts. Reliable sensors help you avoid false readings and protect your engine.
Tip: Always check for leaks and watch your gauge after replacing the oil pressure sensor. This helps you find problems early and keeps your engine safe.
You now know how to change your oil pressure sensor. Always use new sealing washers or O-rings. Tighten the sensor to the correct torque. Put everything back the right way. Make sure the electrical connections are tight and clean. If you are not sure, ask a professional for help. Checking your car often helps it run well. Feel good about fixing your car yourself and using sensors you can trust!
You might see the oil pressure warning light on your dashboard. Sometimes, you notice strange readings or hear engine noises. If you spot leaks near the sensor, that’s another sign. You should check the sensor or ask a mechanic.
You shouldn’t drive with a bad sensor. It can give false readings and hide real engine problems. If you see the warning light, stop and check your oil level. Replace the sensor soon to keep your engine safe.
You need a sensor socket, ratchet, thread sealant, rags, and safety gear. A torque wrench helps you tighten the sensor just right. Always check your car’s manual for any special tools.
Most people finish the job in 30 to 60 minutes. If the sensor sits in a hard-to-reach spot, you might need more time. Take it slow and double-check your work.
You can find quality oil pressure sensors at trusted suppliers like Hefei Wnk Smart Technology Co., Ltd. Their sensors fit many vehicles and offer accurate readings. Want help choosing the right sensor? Reach out to their customer service team!


